 |
|||||||
|
Introduction to StoryBoard Quick 6 Studio Edition Welcome to StoryBoard Quick 6 Studio Edition and congratulations on this important step toward easy digital storyboarding. StoryBoard Quick Studio is the newest addition to PowerProduction Software's line of storyboarding software which focuses on ease of use and complete functionality. StoryBoard Quick Studio adds features and artwork which improve the user experience, on top of the streamlined user interface and storyboarding power made famous by StoryBoard Quick. This Studio Edition Addendum will guide Quick Studio users through the added features unique to the StoryBoard Quick 6 Studio Edition. For more basic use of StoryBoard Quick Studio, see the StoryBoard Quick 6 User Manual. Installation and System Requirements If you have previously installed StoryBoard Quick on your computer, installing StoryBoard Quick Studio will upgrade and replace your copy of StoryBoard Quick. System Requirements for StoryBoard Quick 6 Studio
Installing Macintosh:
Installing Windows: If you purchased a boxed copy, insert CD and the installer will automatically start. If you purchased a downloaded copy, open the installer file from the folder where you saved it during the download. Follow instructions on screen. Launching StoryBoard Quick Studio After installing StoryBoard Quick 6 Studio, a StoryBoard Quick folder will appear in the location you chose during the installation. If you selected to have a shortcut icon generated, one will be placed on your desktop. You may also access the program as follow: On Macintosh: Open the Applications folder then the StoryBoard Quick folder and double-click on the StoryBoard Quick 6 Studio application icon. On Windows: Go to Start Menu > Programs > StoryBoard Quick > StoryBoard Quick 6 Studio. Authorization and Registration The first time StoryBoard Quick Studio is launched on a newly-installed computer, the software will need authorization in order to continue. When the StoryBoard Quick Studio Registration dialog box appears, type your StoryBoard Quick Studio Serial Number into Step One. While connected to the internet, click the Register Online button for 24-hour access to authorization. You will be taken to the PowerProduction Online Registration website where you will be given the opportunity to register and receive an authorization code. Once the online form is filled out and submitted, you will receive your authorization code. Copy and paste, or type, this code into Step Two of the StoryBoard Quick Studio Registration dialog box. Once you have your authorization code in Step Two, click the Save button. Now StoryBoard Quick Studio is authorized on the computer. If you do not have access to an internet connection on the computer on which you wish to install StoryBoard Quick Studio, phone authorization is available during office hours. Visit www.powerproduction.com for phone number and office hours. User Interface Additions QuickShots Technology StoryBoard Quick Studio introduces QuickShots Technology. This feature simplifies and expedites quick storyboard composition by providing the user with several specifications with which to create a pre-arranged storyboard frame and corresponding caption slug line. The QuickShots wizard can be accessed from Frame > New QuickShot, from its button on the Main Toolbar, or by pressing space when positioned on the Frame Window. When the QuickShot wizard opens, the Overview Window will also open in order to allow you to see the development of your entire project as you compose QuickShots.
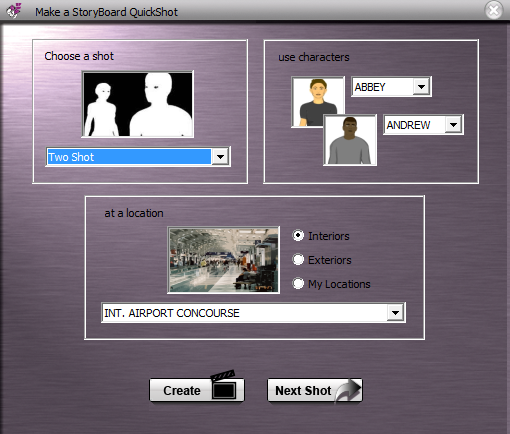
Shot Type The first selection in the QuickShots wizard is which shot type the new QuickShots frame will use as a template. Once you choose a shot type from the dropdown menu, a preview will appear above where you can see the orientation of the characters and location. The first seven shot types involve two characters (Two Shot, Two Shot Left, Two Shot Wide Right, Two Shot Wide Left, Two Shot Wide Center, Over-The-Shoulder Shot Right, and Over-The-Shoulder Shot Left). The next nine shot types only involve one character (Medium Shot Right, Medium Shot Left, Medium Shot, Close Up Right, Close Up Left, Close Up Center, Extreme Close Up, Hero Shot, and Anti-hero Shot). The last shot type (Establishing Shot) does not include any characters. Characters Here you will choose which characters will be used in the template. The first character chosen will appear in the top preview thumbnail. This character is used in the left-most position in QuickShots which involve two characters. The second character will appear in the bottom preview thumbnail and is placed in the right-most position in Two Shots. The first character is always used in QuickShots which involve only one character. Location The standard StoryBoard Quick locations are available in the Location dropdown menu and are organized by Interiors and Exteriors. The third category is labeled My Locations, from which you can select Browse and import a digital photo from your computer. 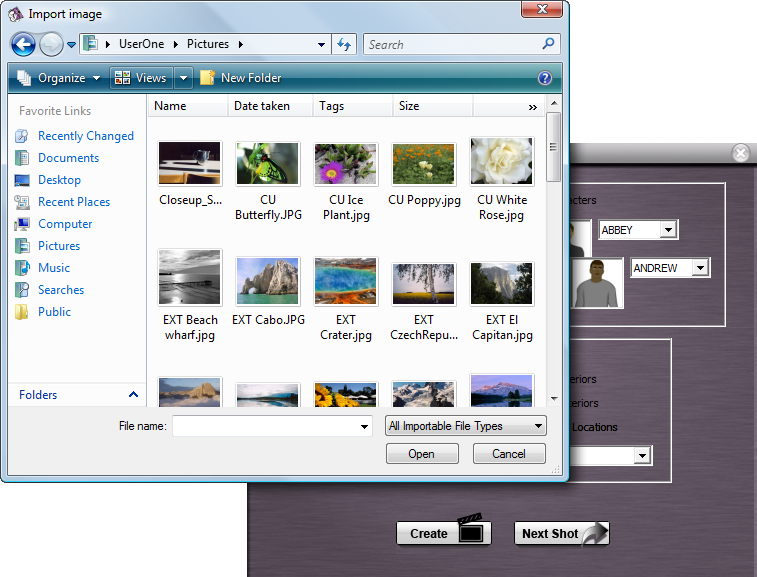
All imported photos which have been previously used as QuickShot locations will be copied to your My Locations folder so they are later accessible in this dropdown menu. When you select a location from any of these categories, a preview will appear in the preview thumbnail above the dropdown menu.
Create a QuickShot and Next Shot Selecting Create will build your frame based on the QuickShot specifications you have made. If the current frame is blank, your QuickShot will be created in the frame. If the current frame is not blank, a dialog box will appear: to avoid overwriting what is currently in the frame, click Insert and the QuickShot will be inserted directly after the current frame; to overwrite what is in the current frame, click Replace to create the QuickShot. 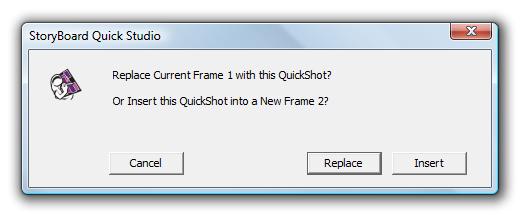
Next Shot will insert a new blank frame after the current frame, so you can immediately create a new QuickShot in your project's sequence. To exit or cancel out of the wizard, click the X button in the top right corner of the box. QuickShot Captions QuickShots will automatically generate slug lines in the captions to complement your QuickShot frames. The format of the captions uses the location name as the slug line, followed by the shot type and name(s) of the character(s) involved: INT. AIRPORT CONCOURSE
When using backgrounds from your My Locations category, the image's file name will be used as the slug line. It's a good idea to use helpful file names when using the images in QuickShots. In the following example, the image name used is "EXT Cabo.JPG." EXT Cabo
New Poses StoryBoard Quick Studio adds extra poses to all the standard StoryBoard Quick Characters, My Characters, and Suite Characters! Now in addition to Stand, Walk, Run, Jump, Sit, and Prone, the characters are available in Phone, Point/Shoot, Fight, Drive, Type, and Lounge. All new poses come in the standard three elevations (high, eye-level, and low) and all eight rotations. The new positions are accessible an expanded Character grid alongside the standard Quick poses. 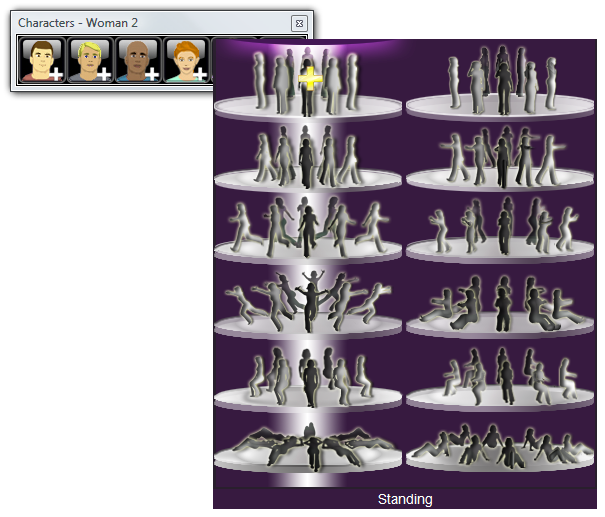
Phone Characters now can stand while holding a cell phone to their ear with their hand. The cell phone is color-customizable using the Shoe Attribute Color on the Color Palette. Point/Shoot The Point/Shoot position poses your characters mid-stride with the front arm extended. This gesture is perfect for showing your characters pointing at someone or something in the distance, or can be used in tandem with a gun prop to plan a police drama scene. Fight In case your characters get rowdy, the Fight pose will position the characters standing with their feet braced at shoulder width with arms that range from ready, mid-punch, or slapping. Drive The Drive position poses your characters sitting with their feet situated for the pedals and hands placed up for the steering wheel. Type Characters can be placed at a computer in the Type position in which they sit with hands placed in a typing pose. Lounge Characters in the Lounge pose are settled into a comfortable, natural position for reclining on the ground or floor. 
Print-to-Sketch Originally developed for our StoryBoard Artist Studio application, the Print-to-Sketch feature is now included in StoryBoard Quick Studio. Print-to-Sketch enables you to print your storyboards in a hand-drawn sketch style. Regardless of the type of images you use to compose your frames (e.g. StoryBoard Quick artwork, imported digital images, line art, etc.), using the Print-to-Sketch feature to print your boards will give the printout a uniform hand-drawn look. To access Print-to-Sketch, use File > Print to Sketch... or open the Print Options dialog box from the Print Toolbar in Print Preview and select the "Sketch" tab. 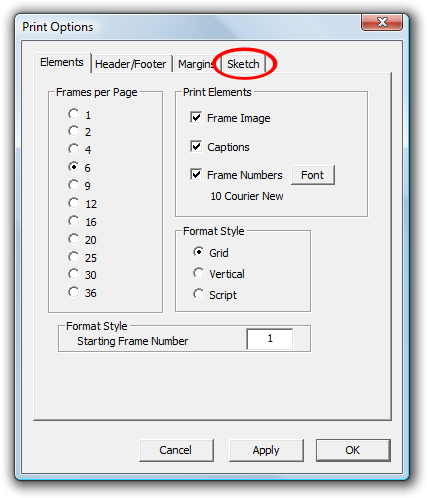
Import Final Draft StoryBoard Quick Studio now can import Final Draft's new version 8 file type (.fdx) into your Captions. Select File > Import Script > Final Draft (.fdx)... to launch the Script Import Dialog Box for FDX files. When importing text using the Import Script command, StoryBoard Quick will make frames and place the chosen script elements into Caption Window below the blank frame. New frames (ready for you to compose your shots) are created based on the options you choose from the import Dialog Box. 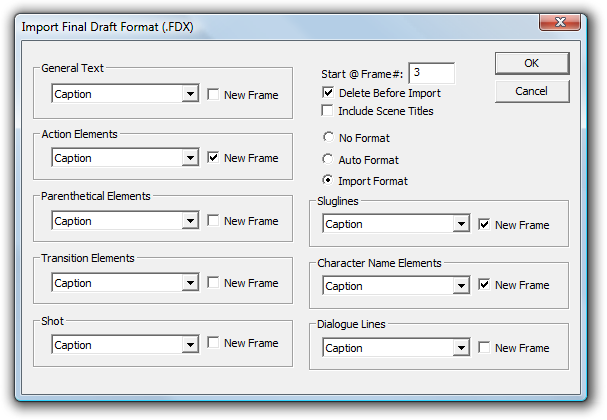
To determine the inclusion and position of script elements (General, Action, Sluglines, Dialogue, etc.), FDX Import operates in the same way as FCF, TAG and RTF Imports. FDX differs in the expanded options for Script Formatting and Scene Titles. To choose to include Scene Titles from your Final Draft script in the Captions, select "Include Scene Titles." They will appear in line with your script within the Caption Window. To determine Script Formatting, you can select from three options: No Format, Auto Format, or Import Format. "No Format" will import the script completely left-justified into the Captions with no indentations for the different elements. "Auto Format" formats the script according to the indentations set for each element in your Preferences. To edit these, open File > Preferences... and click on the Import Script tab, as pictured on the next page. This is where you can change the element's distance from the left margin (in spaces) as well as determine the length of the line before it wraps to the next line. 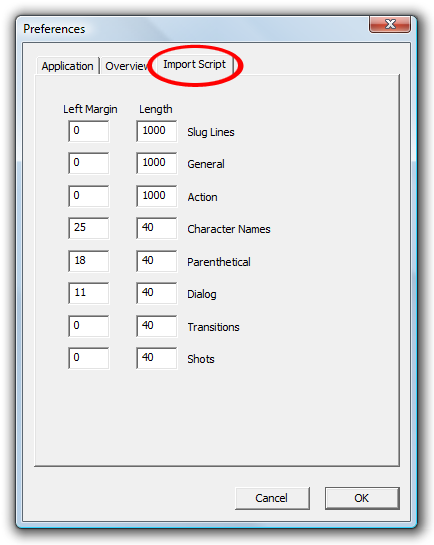
"Import Format" will instruct StoryBoard Quick Studio to use the formatting saved in the Final Draft script, instead of the Import Script Preferences. Hidden Director's Tools
| ||||||||


home | products | support | company | store | solutions storyboardquick.com | storyboardartist.com PowerProduction Software © 1996-2024 | Privacy Policy| Trademark & Copyright | All Rights Reserved | |