

If you’re looking for info about the process of making a short film, you’ll probably be directing it.
Like directing, storyboarding a video or a short film, is all about making decisions. And making great creative decisions in your pre production insures your video production (shooting) and post (editing & sound) will go smoother. Plus your end result will benefit creatively.
First: You can’t elevate an idea until you get it out of your head and onto paper.
Creative insights come from letting our minds wander along tangents.and finding creative insights. Some say this happens best when you’re tired because creative thinking benefits from those distractions and random thoughts that happens when we’re not hyper focused on a task.
If you’re lost about where to begin the process, the easy way to start storyboarding is to parse out your shot ideas and create ‘simple shooting boards!’ Whether you progress to more detailed presentation boards or animatics/storyreels, there’s always gotta be a starting point.
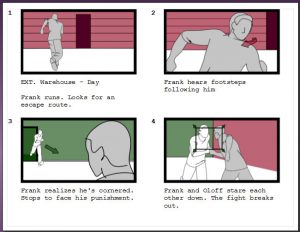
Simple ‘Shooting’ type storyboards for short films
Basic boards
This type of storyboarding indicate where key shot elements should be positioned. Just the major pieces are important and they don’t need to be fancy. In this type of storyboard, the need is to communicate your idea by breaking it down into simple shots of changing action.
Simple shooting-type boards can also be used for broadcast and live action reenactment segments for documentary projects.
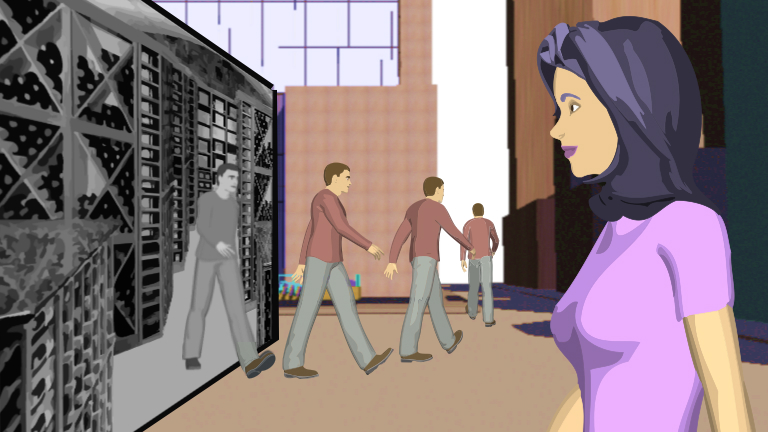
1. How close are the characters in the shot to each other?
2. How close is the camera to the subjects and background.
these two decisions = type of shot (above: Med Long Shot, Med CU, OS, CU pull out to Med) read more
Every shot tells more of the story
To start, decide on key elements of the scene and the size you want your characters to be in the shot during the main part of the action. It’s helpful to make notes in the caption area. Add the scene slugline to indicate where you are in the script. When finished storyboarding, this will act as your shot list for your production.
Begin to visualize a scene:
One straightforward way to start is to compose a wide/full shot or establishing shot (to orient your audience: “where,” “when”, “what” and “who”).
Next shot – make a new storyboard frame and move closer to reveal more information: medium shot (MS) to closeup shot (CU). This is a simple formula which can help you to begin to visually laying out your storyboards. After storyboarding a few shots and scenes, it becomes easier to decided what needs to be shown.
Show the key elements when storyboarding
Detailed characters (clothing or position) isn’t critical for basic boards. How big will they be in the frame will tell the crew where the camera will be in relation to your on-screen talent. Lengthy or complex action scenes will require multiple frames to communicate complex ideas and special effects.
Things to consider when creating storyboards for a short or long video production are:
First, which characters are in the frame?
– How are they moving? Use arrows to show character movement
Next, what are the characters saying to each other?
– Medium or CU shots help to emphasize emotional dialog.
– (use the caption area to note key dialog)
Also determine if has time passed since the last frame?
– Indicate time passage in text when not accomplished visually.
Finally, how close or far away are the elements to each other and the camera?
-Shot types will indicate camera placement.
To get coverage make sure you create a frame for:
- Introduction of a character or location
- Characters and action
- Change of character
- Change of location or time of day
- Condense time
- Major plot points of story that grab attention
- Emotional highlights
- Captions of frames can hold camera notes, visual effect notes, sound notes along with key dialogue.
Students: read more about quick storyboards for video production.
All types of storyboards are easy to create with StoryBoard Software from PowerProduction